首先说明,本博客基于LAMP+wordpress构建
Linux备份MySQL和wordpress目录,采用crontab定时任务完成,脚本如下:
|
1 2 |
xxx@myblog:~# cat /etc/cron.d/blog 35 2 */1 * * root /path/to/blog_backup.sh |
然后加入定时任务:
|
1 2 |
xxx@myblog:~# crontab /etc/cron.d/blog xxx@myblog:~# crontab -l<br>35 2 */1 * * root /path/to/blog_backup.sh |
每天凌晨2点35分自动执行备份脚本,备份脚本内容如下(设置可执行权限):
|
1 2 3 4 5 6 |
#! /bin/bash # mysql backup mysqldump -uuser -ppassword mydb > /path/to/blog-backup/mydb`date +%Y%m%d`.sql # blog backup tar Pcf /path/to/blog-backup/www`date +%Y%m%d`.tar /path/to/www |
备份完毕之后,通过rsync服务同步到windows机器上,配置如下:
Linux服务端:
|
1 2 3 4 5 6 7 8 9 10 11 12 13 14 15 16 17 18 19 20 21 22 23 24 25 26 27 28 29 30 31 32 33 34 35 36 37 38 39 40 41 42 43 44 45 46 |
xxx@myblog:~# ll /etc/rsync/ total 12 -rw------- 1 root root 24 Jun 18 12:01 blog.pas -rw-r--r-- 1 root root 735 Jun 18 11:13 rsyncd.conf -rw------- 1 root root 29 Jun 18 12:01 rsync.pas xxx@myblog:~# cat /etc/rsync/blog.pas rsync-blog-password root@myblog:~# cat /etc/rsync/rsync.pas blog:rsync-blog-password xxx@myblog:~# cat /etc/rsync/rsyncd.conf # Minimal configuration file for rsync daemon # See rsync(1) and rsyncd.conf(5) man pages for help # This line is required by the /etc/init.d/rsyncd script pid file = /var/run/rsyncd.pid lock file = /var/lock/rsyncd.lock port = 873 address = 10.0.0.17 uid = root gid = root use chroot = no read only = no #limit access to private LANs hosts allow=10.0.0.9 hosts deny=* max connections = 32 motd file = /etc/rsync/rsyncd.motd #This will give you a separate log file log file = /var/log/rsync/rsync.log log format = %t %a %m %f %b syslog facility = local3 timeout = 300 [blog] path = /path/to/blog-backup list = no ignore errors auth users = blog secrets file = /etc/rsync/rsync.pas #comment = blog backup dir #exclude = |
然后rsync –daemon –config=/etc/rsync/rsyncd.conf打开rsync服务端守护进程。
Windows客户端:
下载安装cwRsyncServer_4.0.6_Installer(从本站下载请点这里 :cwRsyncServer_4.0.6_Installer),
编写rsync客户端同步bat批处理脚本:
|
1 2 |
cd /d c:\Program Files (x86)\ICW\Bin rsync.exe -vzrtopgu --progress --delete --port=873 blog@10.0.0.17::blog /cygdrive/d/blog-backup/blog-backup < blog.pas |
其中blog.pas为密码文件,放在目录
|
1 |
c:\Program Files (x86)\ICW\Bin |
内容为:
|
1 |
rsync-blog-password |
然后把blog.bat加入到windows的任务计划程序,我从windows7任务计划程序导出的任务配置为:
|
1 2 3 4 5 6 7 8 9 10 11 12 13 14 15 16 17 18 19 20 21 22 23 24 25 26 27 28 29 30 31 32 33 34 35 36 37 38 39 40 41 42 43 44 45 46 47 |
<?xml version="1.0" encoding="UTF-16"?> <Task version="1.2" xmlns="http://schemas.microsoft.com/windows/2004/02/mit/task"> <RegistrationInfo> <Date>2015-06-18T11:58:46.521</Date> <Author>xxx-PC\xxx</Author> </RegistrationInfo> <Triggers> <CalendarTrigger> <StartBoundary>2015-06-18T02:58:16</StartBoundary> <Enabled>true</Enabled> <ScheduleByDay> <DaysInterval>1</DaysInterval> </ScheduleByDay> </CalendarTrigger> </Triggers> <Principals> <Principal id="Author"> <UserId>xxx-PC\xxx</UserId> <LogonType>InteractiveToken</LogonType> <RunLevel>LeastPrivilege</RunLevel> </Principal> </Principals> <Settings> <MultipleInstancesPolicy>IgnoreNew</MultipleInstancesPolicy> <DisallowStartIfOnBatteries>true</DisallowStartIfOnBatteries> <StopIfGoingOnBatteries>true</StopIfGoingOnBatteries> <AllowHardTerminate>true</AllowHardTerminate> <StartWhenAvailable>false</StartWhenAvailable> <RunOnlyIfNetworkAvailable>false</RunOnlyIfNetworkAvailable> <IdleSettings> <StopOnIdleEnd>true</StopOnIdleEnd> <RestartOnIdle>false</RestartOnIdle> </IdleSettings> <AllowStartOnDemand>true</AllowStartOnDemand> <Enabled>true</Enabled> <Hidden>false</Hidden> <RunOnlyIfIdle>false</RunOnlyIfIdle> <WakeToRun>false</WakeToRun> <ExecutionTimeLimit>P3D</ExecutionTimeLimit> <Priority>7</Priority> </Settings> <Actions Context="Author"> <Exec> <Command>D:\blog-backup\blog.bat</Command> </Exec> </Actions> </Task> |
每天凌晨2点58分执行一次rsync同步命令,注意这个时间是在Linux服务端执行备份脚本之后的,便于及时同步数据。
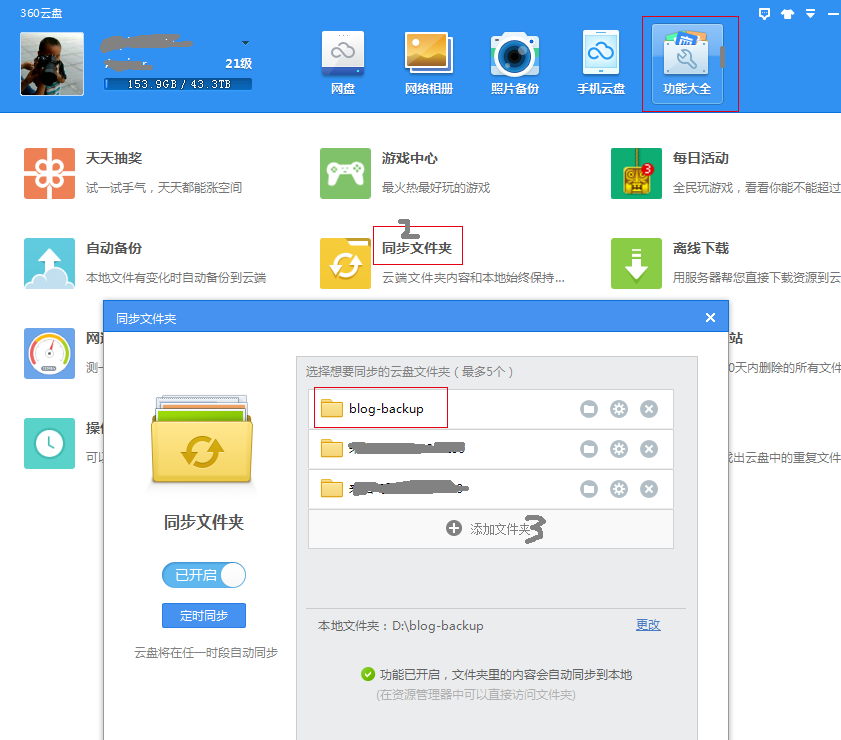
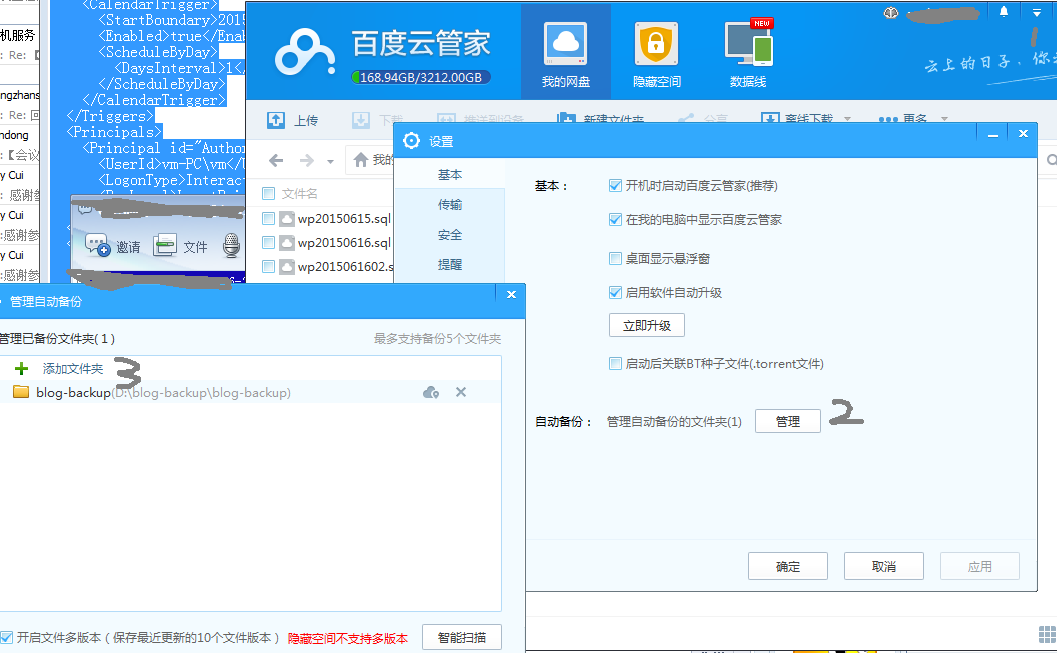
同步完毕之后,还有一步可选操作,也即同步到云盘(360云盘或者百度云盘),备份数据会更加安全(前提是你的云盘账号不被盗走。。。),设置步骤如下:
下载安装云盘客户端,360或者百度都可以,打开客户端,按如下步骤设置即可: